Friends! We're well over halfway through this master bath reno and let me tell you, these few final weeks could not come fast enough! These past few weeks have been filled with dusting after drywall, more dusting, putting together final touches, and sleeping on the couch. Yep, you heard that right! With all the drywall dust, it became impossible for my hubby and I to sleep in our bedroom, so we became frequents on the couch over the holidays. Because who doesn't wake up Christmas morning on the couch?! Bathroom renovations of this size are so cumbersome because they involve every trade all the way from plumbing to painting. They are small spaces but take sometimes just as long as a full kitchen remodel, which when you are living through it - is not fun. But it will all be worth it!....I think. AND all of the sources are linked at the bottom of this post!

Each remodel is different but they all have one thing in common, they are a balancing act. You want to add long-term value to your home while also implementing the design and style that you imagine. Since my husband and I plan on staying in this home for awhile, we had a little more freedom for customization when selecting our floor plan, fixtures, finishes, and hardware.
However everyone still has a budget and in order to stay within our ideal budget, we got creative when it came to the elements we found as a necessity and the elements we thought we could do without. The new design has a chandelier and an existing skylight which brings in a lot of natural light, so we decided to forgo the wood beams we originally planned on installing in the ceiling. With all the natural light and placement of the skylight and chandelier, the beams would have been difficult to place perfectly and ultimately just not worth the cost. We did spend the money to have them smooth our previously textured ceiling.
FLOOR PLAN LAYOUT
After the demo was finished, you really get to see the blank slate and all the possibilities the new design could be. Luckily for us, a lot of our plumbing and electrical was placed where we wanted to create the new rough-ins. Although we had the option to move some things around with how open the space became, we decided to keep everything as close to the current plumbing and electrical as possible. If you're able to do this during your remodel, it's a great way to save on cost!
PLUMBING FIXTURES
How do these add up so quickly?! And how can we like - not pay that much?? For us, a free standing tub and steam shower were non-negotiables, which meant we had to sacrifice a few other elements. Honestly, I became very overwhelmed at the plumbing showroom with all the jet options, rain shower heads, the list was endless. We decided to keep our actual shower fairly simple with basically just one shower head and a removable rod that we can use to spray down those kiddos. Another thing that can drive cost on these fixtures is the finish. Chrome will always be the least expensive (which is what we did) and then specialty finishes like brass or matte black will be in the higher price points.

MIXING METALS
If you know me at all, you know that I live for mixing metals in rooms and a master bath is no exception! No matter what room you're designing, mixing metals can really bring variety, depth, and personality to the space, while tying all elements together. It does seem odd at first but once all the elements come together, you'll see how well everything works together to create one cohesive space. In my master bath, we opted for the chrome plumbing fixtures to save on cost and then mixed in polished nickel cabinet hardware and sconces, accented by a gold mirror and chandelier. Here's some of my fave inspo photos to back up my sanity!


SOURCES LINKED!
I have been getting so many questions on what specific products and materials we used - So I'm sharing the full mood board below! Cabinet install gets completed today and tile starts tomorrow (I think we have to sleep on the couch again). BUT EVERYTHING WILL BE WORTH IT! Stay tuned for more updates!
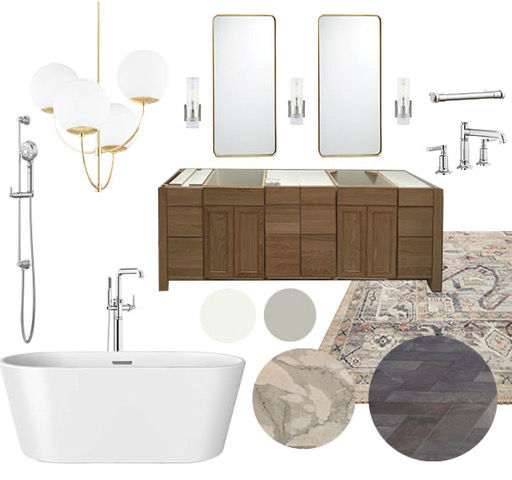
Carrie Chandelier - Gold
Geneva Wall Sconce - Polished Nickel
Rigdon Drawer Pull - Polished Nickel
Invari Lavatory Faucet - Chrome
Invari Floor Mount Tub Faucet - Chrome
Barclay 67" Tub - White with Brushed Nickel Drain
Loloi II Hathaway Runner - Multi/Ivory
Interceramic Vintage Leather Tile - Astoria Gray (Bathroom Floor)
Interceramic Pulse Rectified Tile - Pearl (Shower Walls)
Countertops and Feature Wall - Calcutta Select Honed Marble
Wall Paint Color - Sherwin Williams "Sebring White"
Trim & Doors Paint Color - Benjamin Moore "Brushed Aluminum"
Cabinets: Euro-style White Oak - stain TBD (CE Smith Cabinets)
Comments